
Well, Converting drill batteries to power wheels is very affordable. This will save you money if you convert a drill battery into a DIY process in your child’s Power Wheels car. Many parents find battery conversion in less money, an alternative method for them. If you are looking for a DIY Power Wheels Battery Alternative then this is a great way to reuse old power tool batteries. (Read the latest about how to charge a power wheels battery without the charger)
Besides, this lithium-ion battery is one of the most toxic batteries of all kinds in the world. These batteries can emit lead, mercury, and cadmium which contaminate our landfills. Even, it creates hazardous waste for future generations. Do you want to know how to put Drill Battery in Power Wheels? Well, then you’ve come to the right place. Read the whole article carefully and find out how to put the Drill Battery in the toy car.
How to Put Drill Battery in Power Wheels
You will need some parts and tools before you can put a drill battery in a Power Wheels car. Before starting the whole process make sure that you have collected all the following parts and tools. Those who wish to go into more detail about the power wheel battery charging period can learn about How Many Amps Is A Power Wheels Battery.
Parts:
· 6v or 12-volt power wheel
· Hercules battery adapter
· 30 amp inline fuse
· Lithium tool battery
· Battery charger
Tools:
· Screwdriver
· Electrical tape
· Wire crimper
· Wire stripper
· Soldering iron
Step 1: Identify the Stock Battery
First, you need to identify your kid’s toy car battery. Usually, the battery is located under the hood of your child’s toy car. Remove the battery from the car and locate it. Identifying this means that you can better see how many volts your child’s Power Wheels car battery has. Before choosing a new battery, make sure you know how many volts you need.
Step 2: Change the Stock and Drill the Battery
All you have to do now is cut off the two wires attached to the stock battery. Because you now need a connector plug, with which to connect the wires. But remember, if you do this you will no longer be able to use stock batteries.
Now you need to take the stock battery connector plug and connect it to the 3D printed default battery adapter. To do so you need to connect the negative (black) wire to another black wire. All you have to do to start the work is to twist the wires together and then use electrical tape. After finishing this work you can go back to this part with crimpers.
Besides, you also need to connect them to the positive cable (red) but add a 30 amp inline fuse between them. Because this fuse will protect your motor from excessive power. If too much power ever comes from the motor the fuse will break and it will shut off. If you want to get additional information regarding the topic, you can simply go with How Do I Know If My Power Wheels Battery Is Charging.
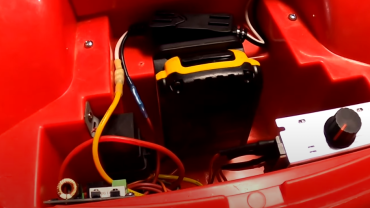
Step 3: Attach the Drill Battery
All the wires connected to the battery are ready. Now it’s time to connect everything. But first, make sure that the fuse is in the red wire. You can use the velcro on the back of the battery adapter holder to mount the fuse inside the car. We also recommend that you install an electric speed controller kit.
So that you can control the amount of energy going into the wheel and the baby can be easy on the new energy. Now attach the drill battery to the car properly. If you want to know more information about this topic, you can follow this guide How To Charge A Power Wheels Battery Without The Charger.
Step 4: Check the Power Wheels
Once you have finished installing the race drill batteries in your child’s car, you can now test them and the motor by pressing the gas pedals and seeing the rear wheel rotation. Take a good look and see if the rotation of the wheels is right. Hopefully, you will notice a huge difference from before. Check the motor well, you will feel that the motor has become stronger than before.
Overall, you will notice a huge difference compared to the stock batteries in your child’s toy car. This lithium tool battery pack is much lighter than other batteries, due to which it speeds up the car very easily. In general, these lithium tool batteries increase battery life much more efficiently than the 12v or 6v batteries you use in power wheels.
Step 5: Last Stage
If you make all the connections in the car properly then hopefully the test will be successful and the car also works great. Now you have to check all the wires to see if all the wires are safe. The most efficient work would be if you soldered all the wires together.
If you solder, the wires would be protected, the wires would not hang, and there would be no possibility of tearing. Now you can use a multimeter to check the battery voltage. Make sure the battery voltage is compatible with the vehicle.
Now you turn off everything in the car and don’t forget to clean the whole car. Once the car is cleaned, put everything back. Otherwise, some parts can be lost, and you will not be able to find what you need. Charge your car after installing a new drill battery. If you do not have a charger, you can buy a replacement ride-on charger. But it is best if you use a manufacturer’s charger to charge the battery.
Final Thoughts
If you want to speed up your child’s power wheels car for less money then you can choose this battery. These batteries are a great DIY project to use on stock power wheels. However, you need to make sure that you have installed the new motor and gearbox in the car along with installing this drill battery. This is because drill batteries reduce motors and gearboxes much faster.
On the other hand, you can install the ESC kit on the car that will control the voltage going towards the wheels.