
Learn- How To Hook Up A Car Battery To A Power Wheels
Well, we’ll learn how to hook up a car battery to a power wheels today. A low Power Wheels battery can be irritating and depressing. It comes to an abrupt end, and your child must now wait for the battery to recharge. A automobile or car battery can be placed in Power Wheels. (Read more about Store Your Power Wheels)
The technique is simple, however fitting the larger car battery requires time-consuming vehicle modifications. The addition of a car battery does not increase the speed of the Power Wheel. But, it does allow your child to drive for longer periods of time before the battery needs to be recharged.
If you’re ready to get started, we’ll lead you through the entire process step-by-step. You’ll be able to install a car battery in a Power Wheel once you’ve finished. Let’s get started.
Remove the Existing Battery
This is likely to be the most straightforward aspect of the project. It also appears so self-evident that you’re probably wondering why we even brought it up. There are two main reasons for this:
To double-check the positive and negative wire colors.
After changing the battery compartment, measure the space to ensure there is enough room for the new battery. You’ll want to double-check that the battery will fit.
After you’ve taken your measurements, you can move on to the following step: making space for the new battery.
Hook Car Battery to Power Wheels
Even when there is space at the back for a battery, most people prefer to put it in the front. The truck is already carrying the weight of the children, and adding more weight in the back does not evenly distribute the load.
Prepare Space for the Battery
The front section of the car will very certainly have to be cut away. You’ll need the following items:
Keep the hood from shutting while you work with a bungee cord or another technique.
A plastic cutting tool. Because of the limited space, a Dremel tool will be useful.
To create a new grill, you’ll need a piece of sheet metal. Instead of a flat piece, you’d prefer something with some ridges. It must be long enough to wrap around the battery on both sides and in front.
- To hold the new grill in place, you’ll need screws or bolts.
- a screwdriver and a drill
- Terminals for batteries
- Pliers for Electrical Work.
It’s time to get started once you’ve gathered your resources.
Steps to Install
- Make a plan to keep the hood from sliding off. Almost any vehicle should be able to use a bungee cord.
- If you haven’t already done so, remove the grill.
- With your Dremel tool, remove the front battery compartment. A grinder will most likely be too large to fit in the space, and a hand-held plastic saw will take an eternity.
- Replace the battery once you’ve finished.
Ensure Proper Battery Placement
If you don’t want the battery to fall out while your child is driving, you’ll need a way to secure it. You’ll need to build another grill. How To Fix Power Wheels Steering.
This is critical since you are not cutting the sheet metal to cover the front. Instead, you’re creating a three-sided container, similar to a box. The goal of your first cuts is to make the metal simpler to bend.
- Make slits in the top and bottom of the metal, as well as a third in the center. Remember that you will be folding the metal to make the housing.
- Each side of the metal should be bent back at a 90-degree angle.
- Next, cut each side, leaving about two inches on each side. Fold these two sides together to form a flange that will be used to secure the sheet metal to the vehicle’s battery compartment.
- After you’ve made the cuts, install the new grill. Make any necessary changes before proceeding to the final modifications. Make careful to allow enough space for the flanges.
- Fold the ends to a 90-degree angle to make your flanges.
- Check to determine if it is a good fit. Drill holes on the sides or front of the battery box, then slide the grill into place.
- Drill holes in the housing and flange.
- Fasteners are used to secure the grill to the housing.
Insert/Hook the New Battery
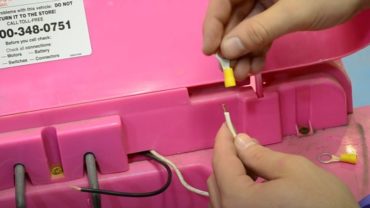
It’s time to connect the batteries now that you’ve completed the difficult phase. This is going to be simple and quick. The power wheel must be connected to the battery, but the motor harness (or connection) must be replaced. Check the polarity of the wires before cutting it off.
Black will be used for the positive on some vehicles, while black will be used for the negative on others (or red). This will be indicated by the coupler. After that, you must attach battery terminals to the cables. Each wire should be stripped down about a quarter inch, then fed into the terminals properly.
It’s time to put the battery in. Install it and connect the wires to the battery. Tighten them to ensure that they are securely linked. That’s all there is to it. The Power Wheel is up and running. How to Charge Fisher Price Power Wheels Jeep.
Performance of Car Battery
Many wonder if the automobile battery will harm the Power Wheels’ electronics. No, an automobile battery is 12 volts. The difference is power storage, not power output.
As a result, don’t expect speedier Power Wheels. This replacement is meant to extend the vehicle’s range. A faster battery would be required for speedier vehicles. How To Charge Kawasaki Power Wheels.
Final Thoughts
Installing a car battery in a Power Wheel is simple but time consuming. The larger battery will need modifying the vehicle’s battery compartment. That will be the most difficult and frustrating element of the process. All you need is some tools and a sheet of metal.
Other battery changes exist. A pair of Milwaukee Drill batteries can replace the Power Wheels battery. Some people utilize lawn tractor batteries, while others use brushless motors.


